

Astoria App Support
Got questions? We’ve got answers!
Need help setting up your Astoria Lighting App? We’re here to help! Expand each section to access short videos that walk you through setting up your App.
Astoria Lighting App Setup

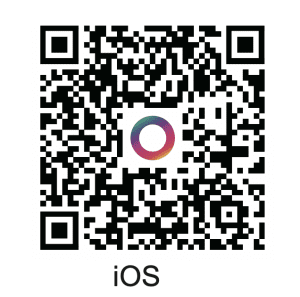
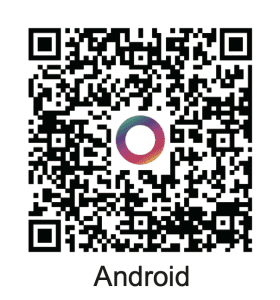
Download the Astoria Lighting App on your Smartphone
Quick Astoria Lighting App Tour
Astoria Lighting App: Main Features Overview (4-Channel)
This outline covers the primary features and navigation elements available within the Astoria Lighting mobile application.
1. Main App Screen and Controller Selection
View Controllers: The main screen displays all controllers currently connected to your lighting system.
Access Controller: Click on a specific controller to enter its main control screen.
2. Basic Light Control
Color Selection: On the main screen, select different colors to instantly change your lights.
Brightness Adjustment: Use the controls to adjust the brightness level of your lights.
3. Using Pre-made Patterns
Access Patterns: Click the Patterns icon at the bottom of the screen. This displays folders of pre-made patterns.
Select Pattern: Choose a pattern folder (e.g., “Christmas one”) and then select a specific color combination (e.g., “red, green, and white”) to activate the pattern.
4. Creating Custom Patterns
Enter Custom Mode: Click the Custom icon at the bottom of the screen.
Start Customization: Choose Create Customization Mode.
Customize Lights: In this mode, each individual light is addressable, allowing you to choose different colors and patterns for specific architectural features.
5. Setting Up Timers
Access Timers: Click the Timer icon.
Configuration: Inside the Timers section, you can set up schedules to automatically activate different patterns or custom looks at specific times.
6. Accessing and Configuring Settings
Navigate to Settings: Click the Settings icon.
Naming Device: Give your controller a unique name for easy identification.
Location and Time Zone: Set the location and time zone for your device, which is essential for accurate sunrise/sunset scheduling.
Astoria Lighting App User Manual
Astoria Lighting App User Manual (4-Channel)
This outline summarizes the key sections of the full Astoria Lighting App User Manual.
Getting Started
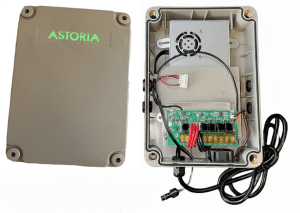
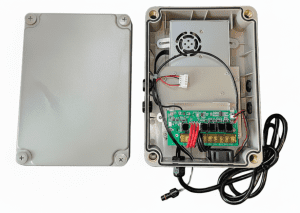
Wiring and Powering the Controller
Connecting the Controller to the App
Includes both Bluetooth and Wi-Fi setup
Basic App Navigation and Control
Using Patterns and Creating Custom Designs
Scheduling and Timers
Advanced Features and Settings
Troubleshooting and Support
Firmware Updates
Sharing Device Access with Family
App Download and Account Setup
Astoria Lighting App: New Account Setup (4-Channel)
This outline details the process for downloading the Astoria Lighting app and creating a new user account.
1. Download the Astoria Lighting App
Search the App Store: Go to the Apple App Store or Android Play Store.
Find the App: Search for “Astoria Lighting.”
Identify Icon: Look for the app icon featuring a colorful circle.
Install and Open: Download and open the Astoria Lighting app.
2. Create a New Account
Access Sign Up: Once the app is open, click the “Sign up” link located in the top right corner of the screen.
Enter Credentials:
Enter your preferred email address or phone number.
Add a password.
Get Verification Code: Select the “Get Verification Code” button.
A verification code will be sent to the email or phone number you entered.
Finalize Account:
Enter the received verification code.
Select the “I agree to the terms and services” checkbox.
Click the “Sign up” button to complete the process.
Connecting to Wi-Fi
Astoria Lighting Controller Setup: Connect to Wi-Fi
(4-Channel)
This tutorial outlines the two-part process for connecting a new Astoria Lighting controller: first via Bluetooth for configuration, and then via Wi-Fi for network use.
Initial Connection via Bluetooth
This phase gets the controller connected to the app temporarily to enable network configuration mode.
Step 1: Start the Connection Process
Open the Astoria Lighting app.
Click the plus button (+) at the top of the screen.
Choose the Bluetooth connection option.
Hit Connect.
Step 2: Complete Bluetooth Handshake
Once the device is connected via Bluetooth, hit Enter.
Configuring Network (Wi-Fi) Mode
This phase prepares the controller for the long-term Wi-Fi connection.
Step 3: Access Network Configuration Settings
Hit Settings on the bottom right corner of the app.
Choose the bottom option: Configure Network Mode.
Hit Confirm.
Step 4: Initiate Wi-Fi Connection Setup
Return to the main screen (Hit Mode, then Back on the top left).
Hit the plus button (+) again.
The device should now appear with a Wi-Fi option. Choose this option to proceed.
Step 5: Connect to the Wi-Fi Network
Select a 2.4 GHz network from the list.
Enter your username and password for the selected network.
Hit Connect.
Step 6: Finalize Connection
Allow up to 2 minutes for the connection process to complete.
Once successfully connected, enter the same password you used previously.
Hit Confirm.
Start Using the Controller
Step 7: Activate the Lights
Toggle on your controller to begin using your lights.
Bluetooth Setup
Astoria Lighting Bluetooth Setup
This tutorial outlines the simple process for connecting your Astoria Lighting controller directly via Bluetooth for local control, without configuring a permanent Wi-Fi network connection.
Getting Started
Ensure you are standing within approximately 20 feet of the controller/control box for a successful connection.
Connection Steps
Step 1: Start the Connection Process
Open the Astoria Lighting app.
Tap the plus button (+) in the top right corner.
Step 2: Select Bluetooth Mode
Switch the connection method from Wi-Fi to Bluetooth.
Step 3: Connect and Finalize
Tap the BT button (to select your device).
Hit Enter.
The controller is now connected and ready for immediate Bluetooth use!
Choose a Pre-set Pattern
Astoria Lighting: Choosing a Color Pattern
(4-Channel)
This outline describes the steps to select and activate a specific color pattern from within the Atoria Lighting application.
Steps to Select a Pattern
Step 1: Access Pattern Selection
Open the Astoria Lighting app.
Select Mode from the navigation.
Choose Pattern.
Step 2: Browse and Select Pattern
Browse the list of available pattern folders (e.g., “Christmas one”).
Select a specific pattern (e.g., “Holly and Berry”) from the chosen folder.
Step 3: Activate the Pattern
Toggle the pattern on by hitting the dedicated button next to the pattern name.
The lights should now display the selected pattern.
Create a Custom Pattern
Astoria Lighting: Creating a Custom Look
(4-Channel)
This outline provides the steps for entering customization mode and designing a unique, custom lighting appearance for your home.
Steps to Design a Custom Look
Step 1: Enter Customization Mode
Open the Astoria Lighting app.
Choose the Custom option at the bottom of the screen.
Select create customization mode.
Step 2: Customize Individual Lights
The app will display each individual light that can be controlled.
Select specific lights (e.g., peaks, corners, architectural features).
Assign a color to the selected lights (e.g., warm whites) to achieve your desired effect (e.g., an architectural look).
Step 3: Save Your Custom Look
Hit Save.
Give the look a name (e.g., “Architectural Warm Peaks”).
Hit Create to finalize and save the custom pattern.
Create a Holiday Pattern (Halloween)
Astoria Lighting App: Creating a Holiday Pattern within a Folder
(4-Channel)
This outline details the steps for designing and saving a new pattern inside a specific pattern folder (e.g., Halloween).
1. Access the Pattern Folder
Open the Astoria Lighting app.
Navigate to Mode and then select Pattern.
Choose the specific folder where you want to create the pattern (e.g., Halloween).
2. Design the Custom Pattern
Click the Plus button (+) in the top right corner.
Name the Pattern: Enter a name for the new custom pattern (e.g., “Custom Halloween”).
Select Pattern Type & Direction: Choose a base pattern (e.g., Marquee) and set its direction.
Choose Colors:
Select a color (e.g., Orange).
Use the Plus button (+) to replicate the color across multiple lights.
Add additional colors (e.g., Purple).
Adjust Settings: Modify the Brightness and Speed of the pattern.
3. Save and Activate
Hit Save.
The new custom pattern will appear at the bottom of the list.
Activate: Toggle the new pattern on using the toggle button.
Setting up Timers
Astoria Lighting: Creating a Custom Timer
(4-Channel)
This outline provides the detailed steps for scheduling your Astoria lights to turn on and off automatically using the Timer feature.
Steps to Create a Custom Timer
Step 1: Access the Timer Feature
Open the Astoria Lighting app.
Choose the Timer option located at the bottom of the screen.
Click the plus button to create a new timer.
Step 2: Name the Timer and Select the Mode
Give the new timer a descriptive name.
Choose a Mode for the timer (e.g., Pattern, Custom Look).
If you choose a Pattern, select the appropriate folder (e.g., “Christmas”) and then the specific pattern you want to schedule (e.g., “Traditional Christmas”).
Step 3: Define the Schedule and Duration
Set the repeat frequency by choosing the specific days of the week you want the timer to run.
Set the start time for when the lights will come on.
Set the turn-off time for when the lights will shut off.
Tip: You can choose options like sunrise and sunset for dynamic on/off times.
Step 4: Save and Activate
Once you have finished configuring the settings, simply hit Save to activate your new custom timer.
Setting up Warm Whites (Architectural Look)
Astoria Lighting: Selecting Warm White Color (WW)
(4-Channel)
This outline provides the quick steps to set your lights to a true warm white color.
Steps to Select Warm White
Open the Astoria Lighting app.
Select Mode.
Choose the WW color option.
Check to ensure your lights have changed to a true warm white color.
Family Sharing
Astoria Lighting: Sharing Controller Access
(4-Channel)
This outline provides the steps for allowing family members or friends to control your lights via their own app.
Step 1: Access Device Settings
Open the Astoria Lighting app.
Select the controller you wish to share access to.
Choose Settings in the bottom right-hand corner.
Step 2: Add a Family Member
Click Share Device.
Enter the phone number or email of the person you want to add.
Step 3: Verify and Advise
(Optional) Return to Settings and click Share Manager to verify the person’s contact information has been added.
Advise the family member to restart their app if they do not immediately see the controller added to their device.
Sync your Lights to Music
Astoria Lighting App: Sync your Lights to Music
(4-Channel)
This outline details the steps required to connect your Astoria Lighting controller via Bluetooth and synchronize your lights with music from your phone.
1. Establish Bluetooth Connection
Start Screen: Begin at the controller screen in the Astoria app.
Initiate Connection: Click the Plus button (+) in the top right corner.
Switch to Bluetooth: Click the two connection icons at the top to switch from Wi-Fi mode to Bluetooth mode.
Ensure Proximity: Make sure you are standing within 20 ft of your controller for the Bluetooth connection to work.
Connect:
Once your controller appears, select it.
Hit the Connect button.
Hit Enter once connected.
2. Access and Control Music Mode
Select Music Option: A new Music option will appear on the far right of the top navigation bar. Select this icon.
Control Lights and Audio: Now in the music menu, you can:
Choose a song from your phone’s list.
Select different light patterns that pulsate to the music.
Choose different colors for the music mode.
Play and pause the music directly from the app.
Upload Music from your Personal Music Library
Astoria Lighting App: Uploading Music to Sync (4-Channel)
This outline details the steps required to upload music files from a computer to the Astoria app using a local IP address interface, allowing the lights to sync with the music.
1. Establish Bluetooth Connection
Select your desired Controller in the app.
Switch to Bluetooth mode.
Connect to the controller via Bluetooth (ensure you are within range).
2. Access the Music Upload Interface
Once connected (on the color wheel screen), click the Music tab at the bottom of the app.
On the Music screen, click the Three Dots to open the menu.
Click the Plus Document button.
An IP Address will appear on the app screen.
3. Upload Music from Your Computer
On your computer’s browser, type in the displayed IP address.
Use the computer interface to upload the desired music files to the app.
4. Play and Sync Music
Return to the Astoria App on your phone.
The newly uploaded music file will now appear in your list.
Click the Play button to start the music and sync it with your light settings.
Quick Settings Overview
Astoria Lighting App: Settings Menu Overview
(4-Channel)
This outline provides a quick summary of the main features and options available inside the controller’s Settings menu.
Access Settings
From the main controller screen, click the Gear icon on the top right corner.
Available Options
The Settings menu provides access to the following configuration and management features:
A. Device Identification
Change the Name of the Device.
Set Device Settings (General configuration).
B. Lighting Zone Configuration
Configure Zones: Allows setting up to four zones for the lighting system.
C. User and Access Management
Device Sharing: Share control of the device with a family member or friend by entering their phone number or email.
Manage Password.
D. System Management
Reset Device.
View System Settings (Other various system-level configurations).
Configure Lighting Zones
Astoria Lighting App: Advanced Zone Setup and Customization (4-Channel)
This comprehensive outline details the steps for configuring lighting channels (zones) in the app’s settings and then creating and managing custom light groups within the Patterns area.
1. Configure Channels/Zones in Settings
From the Controller list screen, click on the desired Controller.
Click the Gear icon in the top right corner to enter Settings.
Locate the section for Channels (or Zones).
Configure each Channel/Zone by setting the Pixel Count (number of light bulbs/lights) associated with that area (e.g., set Channel 1 to 300 pixels).
2. Create Custom Light Groups (Zones)
Navigate to the main controller screen and click Patterns at the bottom.
Tap the Custom option at the top.
Tap the Plus button at the bottom to enter customization mode.
Select the Channel you want to work within by tapping the current channel name (e.g., “Channel 1”) at the top.
Select the individual lights (pixels) you wish to group (e.g., lights one through five).
Click the Create Group folder at the top.
Re-select the lights for the group.
Click Create in the top right, give the group a name (e.g., “Zone 1”), and hit Create again. The new group will appear at the bottom.
3. Customize and Manage Groups
Configure Colors: Click into the new zone (e.g., “Zone 1”) at the bottom to set its colors.
Delete a Group: To remove a custom zone, Long Press on the group name (e.g., “Zone One”) at the bottom and confirm the deletion from the pop-up menu.
Configure Pixels in your Lighting Zones
Astoria Lighting App: Configuring Zones
(4-Channel)
This outline details the steps for accessing the device settings to name and set the pixel count for different lighting zones.
Access Settings
Click the Gear icon on the top right corner of the controller screen to enter Settings.
Configure Zones
Locate the list of different zones (e.g., “Zone 1”).
Select a Zone to modify (e.g., Zone 2).
Rename the Zone: Enter a new, descriptive name (e.g., “East Side of the House”).
Set Pixel Count: Set the number of pixels (number of bulbs in a particular section of your lighting system) associated with that zone (e.g., 300).
Hit Save.
Note on Zones
The Astoria lighting system allows for the creation of up to four zones.
Firmware Updates
Astoria Lighting: Firmware Update Tutorial
(4-Channel)
This outline details the process for updating the firmware on your Astoria controller to access new software features.
Step 1: Check Connection Prerequisites
Ensure you are standing within approximately 20 feet of your controller to maintain a reliable Bluetooth connection.
Verify that your phone is within range of your active Wi-Fi network.
Step 2: Connect the Controller via Bluetooth
Open the Astoria Lighting app and go to the Home Screen.
Click the plus button located in the top right corner.
Switch the connection mode from Wi-Fi to Bluetooth (located on the top right).
Choose the controller that appears in the list (the option marked with BT).
Select Enter to establish the Bluetooth connection.
Step 3: Download the Firmware Update
Once successfully connected via Bluetooth, click Enter.
Navigate to the Settings option in the bottom right of your screen.
Within the settings menu, click on Firmware Update.
Click the Download link to begin downloading the new firmware files.
Step 4: Start the Update
Wait for the download process to complete.
Click Start Update.
Important: stay close to your controller (within the 20-foot range) to keep the Bluetooth connection active during the upload process, which will take a few minutes.
Step 5: Finalize the Update
Once the firmware update is complete, you will receive a notification.
Click Confirm.
Your firmware update is now complete.
Create a Device Group
Astoria Create a Device Group
(4-Channel)
This outline details the process for grouping multiple controllers together so they can be controlled as a single device within the Astoria Lighting app.
Step 1: Access Controller Settings
Open the Astoria Lighting app and navigate to the Home Screen.
Select one of the controllers you want to include in the group. Open the controller’s Settings Menu
Step 2: Open Device Group Settings
Within the settings menu, select Device Group.
The app will display available controllers that can be grouped together.
Step 3: Select Controllers for the Group
Choose all controllers you want to combine into a single group.
Verify that all desired controllers are selected before continuing.
Step 4: Name and Confirm the Group
Enter a name for your new controller group.
Click Confirm to finalize the setup.
Step 5: Control Your Grouped Lighting
Once the group has been created, the selected controllers will function as a single device.
You can now control the grouped lighting system together through the app.
Download the Astoria Lighting App on your Smartphone
Quick Astoria Lighting App Tour
Astoria Lighting App: Main Features Overview (v1)
This outline covers the primary features and navigation elements available within the Astoria Lighting mobile application.
1. Main App Screen and Controller Selection
View Controllers: The main screen displays all controllers currently connected to your lighting system.
Access Controller: Click on a specific controller to enter its main control screen.
2. Basic Light Control
Color Selection: On the main screen, select different colors to instantly change your lights.
Brightness Adjustment: Use the controls to adjust the brightness level of your lights.
3. Using Pre-made Patterns
Access Patterns: Click the Patterns icon at the bottom of the screen. This displays folders of pre-made patterns.
Select Pattern: Choose a pattern folder (e.g., “Christmas one”) and then select a specific color combination (e.g., “red, green, and white”) to activate the pattern.
4. Creating Custom Patterns
Enter Custom Mode: Click the Custom icon at the bottom of the screen.
Start Customization: Choose Create Customization Mode.
Customize Lights: In this mode, each individual light is addressable, allowing you to choose different colors and patterns for specific architectural features.
5. Setting Up Timers
Access Timers: Click the Timer icon.
Configuration: Inside the Timers section, you can set up schedules to automatically activate different patterns or custom looks at specific times.
6. Accessing and Configuring Settings
Navigate to Settings: Click the Settings icon.
Naming Device: Give your controller a unique name for easy identification.
Location and Time Zone: Set the location and time zone for your device, which is essential for accurate sunrise/sunset scheduling.
Astoria Lighting App User Manual
Astoria Lighting App User Manual (v1)
This outline summarizes the key sections of the full Astoria Lighting App User Manual.
Getting Started
Wiring and Powering the Controller
Connecting the Controller to the App
Includes both Bluetooth and Wi-Fi setup
Basic App Navigation and Control
Using Patterns and Creating Custom Designs
Scheduling and Timers
Advanced Features and Settings
Troubleshooting and Support
Firmware Updates
Sharing Device Access with Family
App Download and Account Setup
Astoria Lighting App: New Account Setup (v1)
This outline details the process for downloading the Astoria Lighting app and creating a new user account.
1. Download the Astoria Lighting App
Search the App Store: Go to the Apple App Store or Android Play Store.
Find the App: Search for “Astoria Lighting.”
Identify Icon: Look for the app icon featuring a colorful circle.
Install and Open: Download and open the Astoria Lighting app.
2. Create a New Account
Access Sign Up: Once the app is open, click the “Sign up” link located in the top right corner of the screen.
Enter Credentials:
Enter your preferred email address or phone number.
Add a password.
Get Verification Code: Select the “Get Verification Code” button.
A verification code will be sent to the email or phone number you entered.
Finalize Account:
Enter the received verification code.
Select the “I agree to the terms and services” checkbox.
Click the “Sign up” button to complete the process.
Connecting to Wi-Fi
Astoria Lighting Controller Setup: Connect to Wi-Fi (v1)
This tutorial outlines the two-part process for connecting a new Atoria Lighting controller: first via Bluetooth for configuration, and then via Wi-Fi for network use.
Initial Connection via Bluetooth
This phase gets the controller connected to the app temporarily to enable network configuration mode.
Step 1: Start the Connection Process
Open the Astoria Lighting app.
Click the plus button (+) at the top of the screen.
Choose the Bluetooth connection option.
Hit Connect.
Step 2: Complete Bluetooth Handshake
Once the device is connected via Bluetooth, hit Enter.
Configuring Network (Wi-Fi) Mode
This phase prepares the controller for the long-term Wi-Fi connection.
Step 3: Access Network Configuration Settings
Hit Settings on the bottom right corner of the app.
Choose the bottom option: Configure Network Mode.
Hit Confirm.
Step 4: Initiate Wi-Fi Connection Setup
Return to the main screen (Hit Mode, then Back on the top left).
Hit the plus button (+) again.
The device should now appear with a Wi-Fi option. Choose this option to proceed.
Step 5: Connect to the Wi-Fi Network
Select a 2.4 GHz network from the list.
Enter your username and password for the selected network.
Hit Connect.
Step 6: Finalize Connection
Allow up to 2 minutes for the connection process to complete.
Once successfully connected, enter the same password you used previously.
Hit Confirm.
Start Using the Controller
Step 7: Activate the Lights
Toggle on your controller to begin using your lights.
Bluetooth Setup
Astoria Lighting Bluetooth Setup (v1)
This tutorial outlines the simple process for connecting your Astoria Lighting controller directly via Bluetooth for local control, without configuring a permanent Wi-Fi network connection.
Getting Started
Ensure you are standing within approximately 20 feet of the controller/control box for a successful connection.
Connection Steps
Step 1: Start the Connection Process
Open the Astoria Lighting app.
Tap the plus button (+) in the top right corner.
Step 2: Select Bluetooth Mode
Switch the connection method from Wi-Fi to Bluetooth.
Step 3: Connect and Finalize
Tap the BT button (to select your device).
Hit Enter.
The controller is now connected and ready for immediate Bluetooth use!
Choose a Pre-set Pattern
Astoria Lighting: Choosing a Color Pattern (v1)
This outline describes the steps to select and activate a specific color pattern from within the Atoria Lighting application.
Steps to Select a Pattern
Step 1: Access Pattern Selection
Open the Astoria Lighting app.
Select Mode from the navigation.
Choose Pattern.
Step 2: Browse and Select Pattern
Browse the list of available pattern folders (e.g., “Christmas one”).
Select a specific pattern (e.g., “Holly and Berry”) from the chosen folder.
Step 3: Activate the Pattern
Toggle the pattern on by hitting the dedicated button next to the pattern name.
The lights should now display the selected pattern.
Create a Custom Pattern
Astoria Lighting: Creating a Custom Look (v1)
This outline provides the steps for entering customization mode and designing a unique, custom lighting appearance for your home.
Steps to Design a Custom Look
Step 1: Enter Customization Mode
Open the Astoria Lighting app.
Choose the Custom option at the bottom of the screen.
Select create customization mode.
Step 2: Customize Individual Lights
The app will display each individual light that can be controlled.
Select specific lights (e.g., peaks, corners, architectural features).
Assign a color to the selected lights (e.g., warm whites) to achieve your desired effect (e.g., an architectural look).
Step 3: Save Your Custom Look
Hit Save.
Give the look a name (e.g., “Architectural Warm Peaks”).
Hit Create to finalize and save the custom pattern.
Create a Holiday Pattern (Halloween)
Astoria Lighting App: Creating a Holiday Pattern within a Folder (v1)
This outline details the steps for designing and saving a new pattern inside a specific pattern folder (e.g., Halloween).
1. Access the Pattern Folder
Open the Astoria Lighting app.
Navigate to Mode and then select Pattern.
Choose the specific folder where you want to create the pattern (e.g., Halloween).
2. Design the Custom Pattern
Click the Plus button (+) in the top right corner.
Name the Pattern: Enter a name for the new custom pattern (e.g., “Custom Halloween”).
Select Pattern Type & Direction: Choose a base pattern (e.g., Marquee) and set its direction.
Choose Colors:
Select a color (e.g., Orange).
Use the Plus button (+) to replicate the color across multiple lights.
Add additional colors (e.g., Purple).
Adjust Settings: Modify the Brightness and Speed of the pattern.
3. Save and Activate
Hit Save.
The new custom pattern will appear at the bottom of the list.
Activate: Toggle the new pattern on using the toggle button.
Setting up Timers
Astoria Lighting: Creating a Custom Timer (v1)
This outline provides the detailed steps for scheduling your Astoria lights to turn on and off automatically using the Timer feature.
Steps to Create a Custom Timer
Step 1: Access the Timer Feature
Open the Astoria Lighting app.
Choose the Timer option located at the bottom of the screen.
Click the plus button to create a new timer.
Step 2: Name the Timer and Select the Mode
Give the new timer a descriptive name.
Choose a Mode for the timer (e.g., Pattern, Custom Look).
If you choose a Pattern, select the appropriate folder (e.g., “Christmas”) and then the specific pattern you want to schedule (e.g., “Traditional Christmas”).
Step 3: Define the Schedule and Duration
Set the repeat frequency by choosing the specific days of the week you want the timer to run.
Set the start time for when the lights will come on.
Set the turn-off time for when the lights will shut off.
Tip: You can choose options like sunrise and sunset for dynamic on/off times.
Step 4: Save and Activate
Once you have finished configuring the settings, simply hit Save to activate your new custom timer.
Setting up Warm Whites (Architectural Look)
Astoria Lighting: Selecting Warm White Color (WW) (v1)
This outline provides the quick steps to set your lights to a true warm white color.
Steps to Select Warm White
Open the Astoria Lighting app.
Select Mode.
Choose the WW color option.
Check to ensure your lights have changed to a true warm white color.
Family Sharing
Astoria Lighting: Sharing Controller Access (v1)
This outline provides the steps for allowing family members or friends to control your lights via their own app.
Step 1: Access Device Settings
Open the Astoria Lighting app.
Select the controller you wish to share access to.
Choose Settings in the bottom right-hand corner.
Step 2: Add a Family Member
Click Share Device.
Enter the phone number or email of the person you want to add.
Step 3: Verify and Advise
(Optional) Return to Settings and click Share Manager to verify the person’s contact information has been added.
Advise the family member to restart their app if they do not immediately see the controller added to their device.
Sync your Lights to Music
Astoria Lighting App: Sync your Lights to Music (v1)
This outline details the steps required to connect your Astoria Lighting controller via Bluetooth and synchronize your lights with music from your phone.
1. Establish Bluetooth Connection
Start Screen: Begin at the controller screen in the Astoria app.
Initiate Connection: Click the Plus button (+) in the top right corner.
Switch to Bluetooth: Click the two connection icons at the top to switch from Wi-Fi mode to Bluetooth mode.
Ensure Proximity: Make sure you are standing within 20 ft of your controller for the Bluetooth connection to work.
Connect:
Once your controller appears, select it.
Hit the Connect button.
Hit Enter once connected.
2. Access and Control Music Mode
Select Music Option: A new Music option will appear on the far right of the top navigation bar. Select this icon.
Control Lights and Audio: Now in the music menu, you can:
Choose a song from your phone’s list.
Select different light patterns that pulsate to the music.
Choose different colors for the music mode.
Play and pause the music directly from the app.
Firmware Updates
Astoria Lighting: Firmware Update Tutorial (v1)
This outline details the process for updating the firmware on your Astoria controller to access new software features.
Step 1: Check Connection Prerequisites
Ensure you are standing within approximately 20 feet of your controller to maintain a reliable Bluetooth connection.
Verify that your phone is within range of your active Wi-Fi network.
Step 2: Connect the Controller via Bluetooth
Open the Astoria Lighting app and go to the Home Screen.
Click the plus button located in the top right corner.
Switch the connection mode from Wi-Fi to Bluetooth (located on the top right).
Choose the controller that appears in the list (the option marked with BT).
Select Enter to establish the Bluetooth connection.
Step 3: Download the Firmware Update
Once successfully connected via Bluetooth, click Enter.
Navigate to the Settings option in the bottom right of your screen.
Within the settings menu, click on Firmware Update.
Click the Download link to begin downloading the new firmware files.
Step 4: Start the Update
Wait for the download process to complete.
Click Start Update.
Important: stay close to your controller (within the 20-foot range) to keep the Bluetooth connection active during the upload process, which will take a few minutes.
Step 5: Finalize the Update
Once the firmware update is complete, you will receive a notification.
Click Confirm.
Your firmware update is now complete.